
TL;DR
A closet can be an excellent home studio if you treat it right. Focus on placement, proper acoustic dampening, and ventilation—these make the biggest difference. Foam alone won’t cut it; soundproofing and airflow matter most.
Imagine turning a tiny closet into a professional-quality vocal booth or audio workspace. It sounds like a secret weapon for home producers and podcasters, and it’s surprisingly doable. The trick isn’t just slapping foam on the walls. It’s about smart placement, effective dampening, and making sure your space breathes.
Whether you want a quiet spot for voiceovers or a dedicated room for high-fidelity recordings, understanding these essentials can save you money and frustration. You’ll learn why small spaces can actually work to your advantage, and how to avoid common pitfalls like trapped heat and echo.
Acoustic dampening
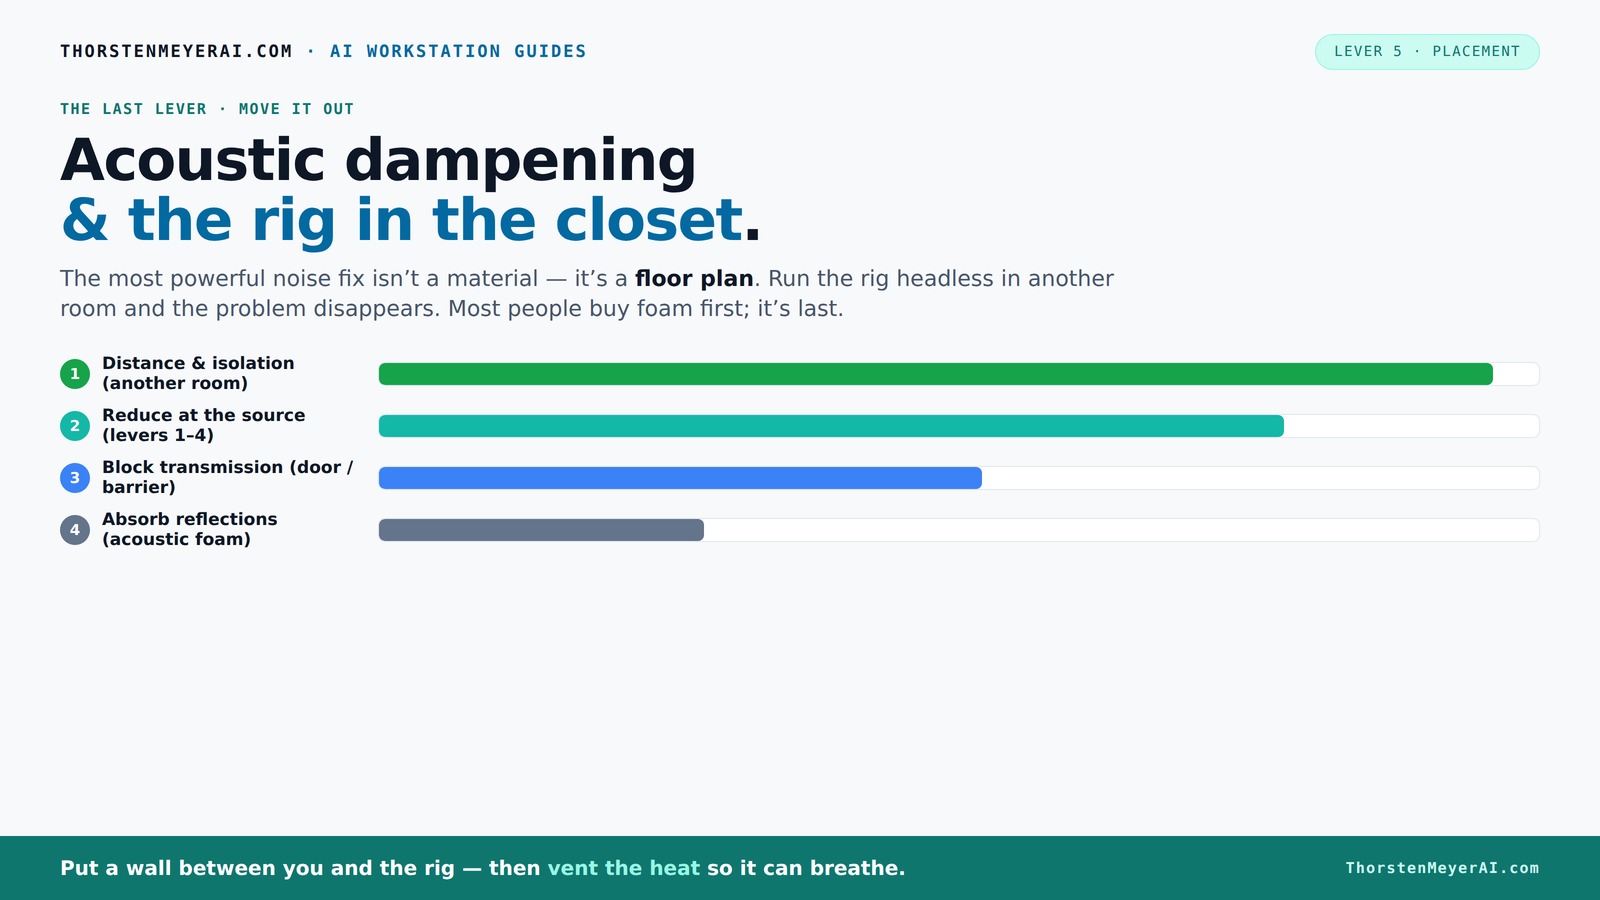
& the rig in the closet.
The most powerful noise fix isn’t a material — it’s a floor plan. A rig you can’t hear because it’s in another room beats any amount of foam. Tap the approaches in Part 1 to see what actually works.
(another room)
(levers 1–4)
(door / barrier)
(acoustic foam)
Contain the noise, not the heat
Key Takeaways
- Small closets can be excellent recording spaces if treated properly—natural diffusion from clothes and small size reduce reflections.
- Prioritize soundproofing and ventilation over foam. A sealed closet traps heat and sounds, risking equipment failure.
- Use bass traps in corners to control low frequencies, especially in tight spaces prone to standing waves.
- Placement of the mic and acoustic treatments should focus on reflection points and avoiding corners to prevent muddiness.
- A 'rig in the closet' setup is flexible and cost-effective but has limits—know when to move to a dedicated room.

Focusound 52 Pack Acoustic Foam Panels 1" x 12" x 12" Sound Proof Foam Panles Soundproofing Noise Cancelling Wedge Panels for Home Office Recoding Studio with 300PCS Double-Side Adhesive
Soundproofing - Acoustic foam panels triangular grooves structure for better noise absorption, helps to reduce and absorb unwanted...
As an affiliate, we earn on qualifying purchases.
As an affiliate, we earn on qualifying purchases.
Why a Small Closet Can Be Your Secret Weapon for Sound
Small spaces naturally cut down on reverb and echo. When you close a closet door, the sound waves bounce around less, creating a tight, controlled environment. Think of it like stacking a bunch of pillows around a microphone — the sound stays focused and clear.
For example, a tiny walk-in closet filled with clothes acts like a natural diffuser. The irregular surfaces scatter reflections, making your recordings warmer and more intimate. This can beat even the priciest acoustic panels in some cases, especially if you treat the space properly.

8 Pack - Bass Traps Acoustic Foam Corner, 8''x8''x12'' Black Bass Traps Corner Studio Foam, High Density and Fire-Proof Acoustic Panels Recording Studio Acoustical Treatments
Acoustic Principle- Bass Trap is a kind of sound absorbing structure specially used to absorb specific low-frequency standing...
As an affiliate, we earn on qualifying purchases.
As an affiliate, we earn on qualifying purchases.
The Right Placement: Where to Put Your Microphone for the Best Sound
Placement is everything. In a small closet, position your mic so it captures your voice directly and minimizes reflections. Usually, this means setting it about six to twelve inches away from your mouth, facing away from reflective surfaces like walls or the door. For more tips, see this guide.
Use the rule of thirds: avoid placing the mic directly against the wall or in a corner, where bass can build up and muddy the sound. Instead, find the 'sweet spot' — usually a few inches from the back wall, with sound-absorbing panels behind and to the sides.
For example, a podcaster found that moving their mic away from the closet door and placing a foam panel behind improved clarity dramatically. The difference was night and day.

TroyStudio Portable Vocal Booth, Large Foldable Microphone Isolation Shield, Music Recording Studio Sound Echo Absorbing Box, Desk & Stand Use Reflection Filter with Thickened Dense Acoustic Foam
【BASIC INFO】: Inside size after setup: 8'' (L) X 10'' (W) X 12'' (H), large space for various...
As an affiliate, we earn on qualifying purchases.
As an affiliate, we earn on qualifying purchases.
Essential Materials for a DIY Closet Studio—What Works and Why
Choosing the right materials is key. Acoustic panels made from recycled cellulose or mineral wool are safe, lightweight, and effective. For bass control, thick bass traps—preferably 4 to 6 inches deep—placed in corners absorb low-end buildup. Learn more about effective acoustic treatments at this resource.
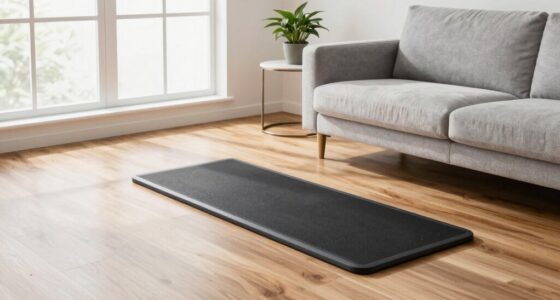
Rugs, thick blankets, and moving pads can serve as quick fixes for reflection points. Use them on the floor, door, or even as temporary wall coverings. For example, hanging a quilt over the door and laying a rug under your chair can cut down echo and noise.
Don’t forget the importance of sealing gaps around the door with weatherstripping or draft stoppers. These small steps prevent sound from leaking in or out, making your setup much quieter.

MUSICUS B-Free 2.0 Modular Vocal Booth for Recording, Portable Sound Isolation Booth for Home Studio, Voice Over & Podcast, 4-Layer Acoustic Panels, Built-in Ventilation (Medium, Black)
Tested Performance: Up to 26 dB sound reduction; NRC 0.89 absorption; KCL third party test data available; built...
As an affiliate, we earn on qualifying purchases.
As an affiliate, we earn on qualifying purchases.
Ventilation and Heat: Keeping Your Closet Studio Cool and Safe
Ventilation is a critical aspect that’s often overlooked when sealing a closet for soundproofing. Without proper airflow, heat generated by your equipment can quickly turn your small studio into an uncomfortable, potentially damaging environment. Overheating can lead to equipment malfunction or reduced lifespan, which is why managing heat is essential.
Installing active ventilation—such as a low-noise exhaust fan or a vent system—allows hot air to escape and fresh air to circulate. This prevents heat accumulation and maintains a safe working temperature. Using ducting or vent panels, you can direct airflow efficiently without compromising your soundproofing efforts. For more insights, see this guide.
For larger setups, consider purpose-built soundproof cabinets with integrated cooling systems. These combine insulation with airflow management, keeping your gear safe and your environment comfortable. Check out this guide on reducing heat and noise in AI workstations for more insights.
Common Mistakes to Avoid When Turning a Closet Into a Studio
Many DIY enthusiasts make simple errors that sabotage their sound quality or damage their gear. The most common: sealing the space completely without considering ventilation, which causes heat buildup and can lead to equipment failure or discomfort during long sessions. For more tips, see this article.
Another mistake is over-treating with foam, which can deaden sound but doesn’t effectively address low-frequency issues or sound leakage. Foam absorbs high-frequency reflections but can make the room sound dull and can even trap sound inside, leading to unintended echoes or muffled recordings. Balancing absorption with bass trapping and soundproofing is key. Over-treating can also create a 'dead' sound that lacks natural warmth, making recordings sound unnatural or overly muffled.
Finally, ignoring proper placement—like putting the mic in a corner or too close to reflective surfaces—can muddy your recordings. Always test different positions and critically listen to the results. Proper placement prevents comb filtering and muddiness, ensuring clear, professional-quality recordings.
When and Why to Consider Upgrading from Your Closet Studio
While a closet setup is a fantastic starting point or for casual use, you may encounter limitations that hinder your progress. Persistent low-end booms, sound leakage into other rooms, or equipment overheating are signs that your current setup might be insufficient. These issues can compromise your audio quality and equipment longevity.
Moving to a dedicated room with proper acoustic treatment and ventilation can provide better control over sound isolation, low-frequency management, and thermal regulation. Building or renting a small dedicated space allows you to optimize every aspect—size, shape, airflow, and soundproofing—tailored precisely to your needs. However, for many hobbyists and semi-professionals, a well-treated closet with proper ventilation remains a cost-effective and practical solution.
Think of your closet as a valuable learning tool and a stepping stone. It’s an affordable, flexible environment that can produce professional results if managed correctly. When your needs grow, upgrading to a dedicated space can unlock new levels of quality and comfort, but mastering your closet setup first will lay a strong foundation.
Frequently Asked Questions
How do I soundproof a closet without damaging the walls?
Use removable acoustic panels, heavy blankets, or foam mounted with adhesive strips. Adding draft stoppers around doors and sealing gaps with weatherstripping also helps. These solutions protect your walls and keep the room quiet.Where should I place the microphone in my closet for the best sound?
Position the mic about 6-12 inches from your mouth, facing away from reflective surfaces. Avoid corners and place a foam panel behind it to absorb reflections. Experiment with angles until the sound feels warm and clear.What materials work best for acoustic treatment in small spaces?
Recycled cellulose panels, mineral wool, or foam are common choices. Bass traps in corners and broadband absorbers on walls improve clarity. For a DIY approach, thick blankets and rugs also help reduce echo effectively.How can I keep my closet studio cool during long recording sessions?
Install a quiet exhaust fan or vent to circulate air. Use ducting or a dedicated vent panel to direct airflow without losing soundproofing. For larger setups, consider a soundproof cabinet with integrated cooling.Can I keep clothes in the closet while converting it into a studio?
Yes, but be aware that clothes add some absorption, which can improve sound quality. Just ensure your gear has proper ventilation, and avoid blocking airflow paths. You might want to remove clothes temporarily during intense sessions for better acoustics.Conclusion
Turning a closet into a studio combines clever use of space, soundproofing, and airflow management. When done right, it’s a quiet, professional-sounding environment that can rival much larger setups. The key is treating it like a system—address reflections, block noise, and keep it cool.
So, next time you think about noise or echo, remember: the best fixes often aren’t just about adding foam. It’s about smart placement, sealing gaps, and making sure your gear can breathe. Your perfect closet studio is within reach—just don’t forget the basics.